|
Tutorial Paper No. WEEl for the September 10-15, 1995 O.S.A. meeting:
BEYOND RAYTRACING William T. Plummer Polaroid Corporation 38 Henry Street, Cambridge, MA 02139
A selection of worked practical examples, some of them new and all of them real, offer insight into the irregular seam between conventional lens design and the calculation of illumination issues. Topics include: * The cosine-fourth law and an easy generalization of it. * Design of flashcube shields and electronic flash reflectors. * Design of focus screens and projection screens. * Halation and the nonlinear formation of an image in a thick photographic print. * The photographic shutter as a lens element. * Some f/# system issues. * Multimode optical fiber coupling with lensed connectors. Tools include Monte Carlo calculations, red yarn, and the eye of an ant. Dr. William Plummer received his PhD in physics in 1965, from Prof. John Strong at the Johns Hopkins University. He is Director of Optical Engineering at Polaroid, where he has spent 26 years developing the unusual optical systems, tooling, and test equipment for the SX-70 folding SLR camera, the Model 600 LMS camera, the Spectra camera, the Captiva camera, medical printers, and other consumer, industrial, and professional products. He holds 80 U.S. Patents, has published numerous papers, and was a recipient of the David Richardson Medal in 1980.
* Let us introduce the first tool, the eye of an ant: Ants are small enough to put in any desired spot in most optical systems. We will use one to personalize a particular concept, that most illumination problems can be understood better by considering an optical system from more than one point of view, and particularly from places otherwise difficult to reach and equip with an observer. Without an ant one must improvise, perhaps by installing a pinhole in one or another strategic place, and then taking a pinhole photograph of the light reaching that spot. Maybe that pinhole can be a tiny flat mirror, to redirect the light for better access. Sometimes an imaginary ant will do the job, as the value is in the concept.
* The cosine-fourth law:
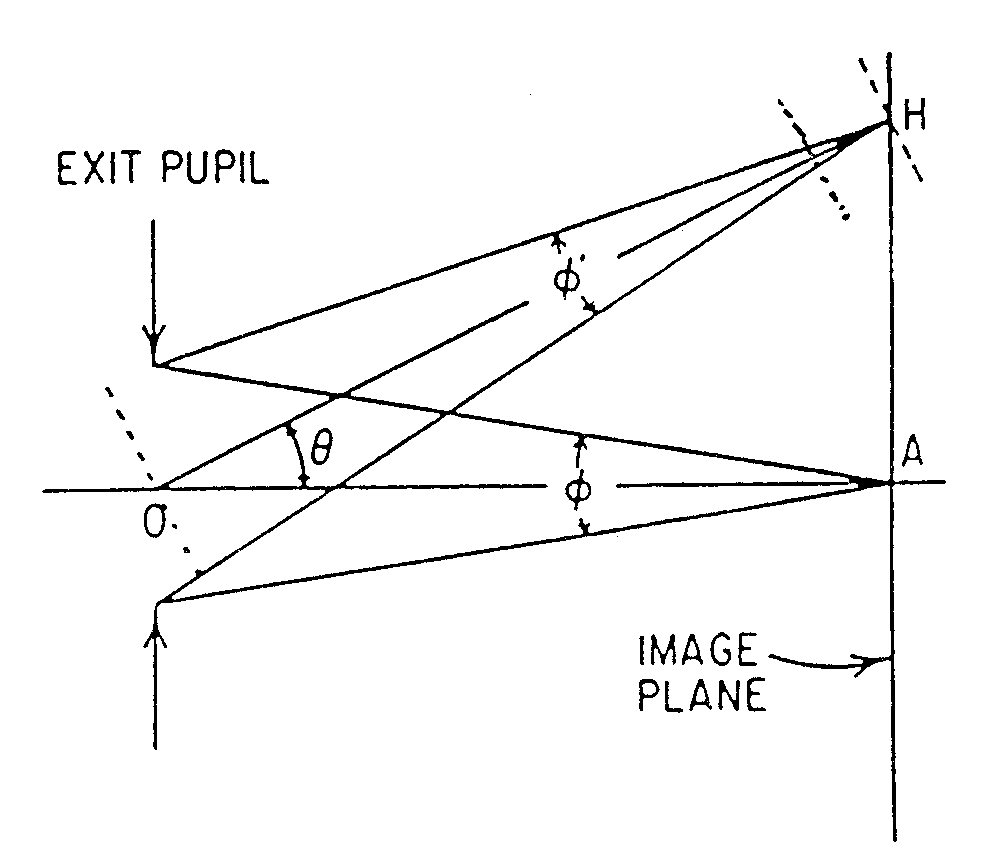
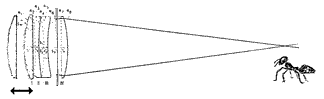
Many illumination exercises use some form of the "cosine-fourth law," a compact description of the way exposure drops off as one leaves the center of a photographic negative. There are really three parts of this drop-off, all easily appreciated by an ant wandering across the negative. Let us start with the simplest case, where the exit pupil is a small round aperture stop on the side of the lens toward the film. The ant starts at the center of the negative, stares at the exit pupil, and then considers it as he walks toward one comer of the film. 1. As the ant leaves the axis, his view of the pupil becomes oblique, diminishing the amount of light by the cosine of the axis angle. Perhaps this factor is more intuitive as the angular departure approaches 90°, and the pupil is seen edge-on. 2. Because the film is nearly flat, not a shell centered on the pupil, the ant gets farther from the pupil with distance. Here we can invoke another familiar principle, the "inverse square law," to identify another reduction factor. After all, a given source of light will be spreading to cover more area as the distance increases. As seen by the ant, the exit pupil looks a little smaller, as well as oblique, as he approaches the comer. Because the distance to the pupil increases as the reciprocal cosine of the axis angle, and because we square it, we apply two more cosines here. 3. If the ant is an experienced observer he will notice that the light reaching the film by his feet is hitting it at at an angle, the same as the axis angle, and that a given bundle of light will therefore expose more and more film, with reduced concentration, away from the axis. Count in a fourth cosine! [Reference: Warren J. Smith, Modern Optical Engineering, Second Edition, McGraw-Hill, N.Y., 1990, pp. 142-145] Together we have four cosine factors, all acting to reduce the concentration of light toward the comers of the film. Simple, right? Well, what if the exit pupil is highly distorted by the lens elements? What if the Numerical Aperture is so large that the inverse square law is a bad approximation? What if the film isn't really flat? And what if the lens apertures start to shade the beam a little at big axis angles, or when used at an unconventional conjugate distance? [Relationship between exit pupil and image points, used to demonstrate that the illumination at point H is cos4theta times that at point A: ]
What our ant needs is an easy generalization of the cosine-fourth law.
* That easy generalization of the cosine-fourth law:
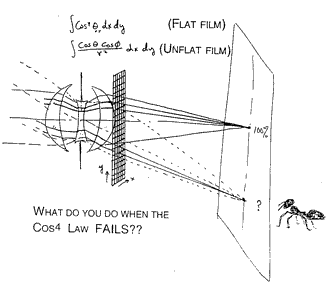
As described, the cosine-fourth law is exact for a small enough flat exit pupil, and when that pupil is observed from a flat film plane. Your lens designer will tell you that dummy surfaces are cheap, and don't even have to be polished during production. For our generalization we will add a dummy flat surface to the optical system. We will put it just after the last lens element so that features on the dummy surface will be seen undistorted by the ant. We will rule gridlines on the dummy surface, making it resemble graph paper, with tiny squares of equal size. Every little square is small enough to make the inverse square law accurate for it -- perhaps 1/10 or less of the distance to the film. The cosine-fourth law can be applied safely to any and all of the little squares -- provided that we use the appropriate axis angle for each one, and provided that the film is still flat. What might have been an awkward attempt to deal with a large and distorted exit pupil becomes a simple summation of the individual cosine-fourth contributions from the myriad of little square pinholes that combine across the dummy flat surface. Which squares do we count? We can raytrace backward, from the ant, through the center of each square on the dummy flat grid, and see which rays actually make it through all of the lens apertures, all the way to the object being photographed. If a grid square looks dark to the ant, we skip it. If the ray makes it we count in that grid square, with a weight equal to the cosine-fourth calculated for that local angle, seen from the ant. First the sum is found for the ant at the center, then at one spot or another across the negative. Simple? A lot of ink has been spilled on this topic at one time or another.
What do you do when the film is not flat? Just allow for the actual height and slope of it when doing the local cosine calculations. If you really prefer algebraic calculations, there is a more tedious way correct for the error in the inverse square law, but it will need a little work for use off axis:
* Design of flashcube shields:
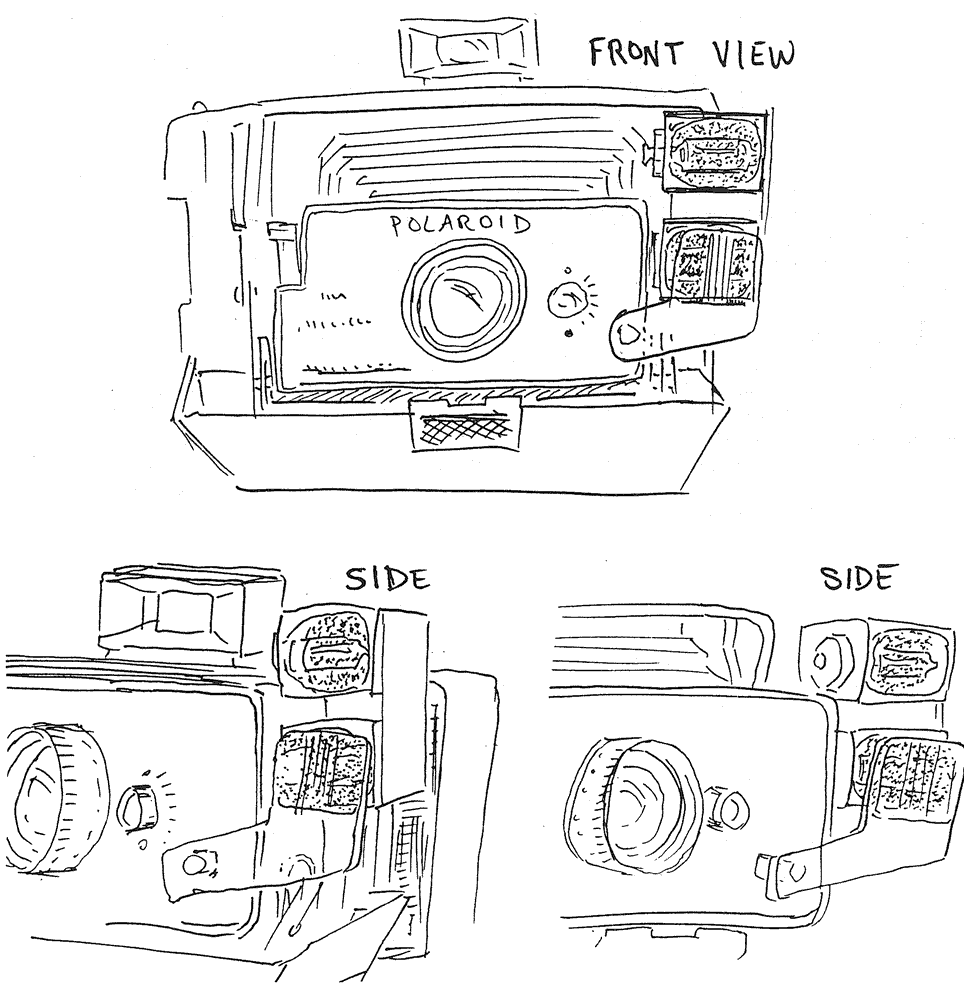
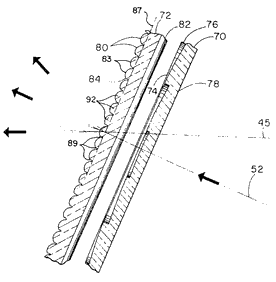
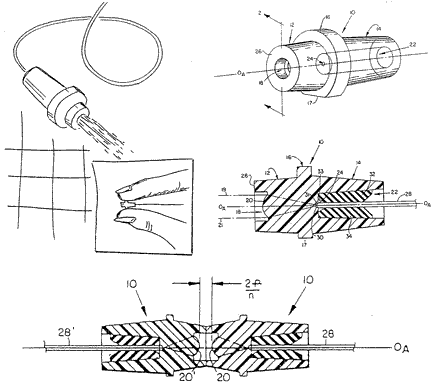
Equipped with our ant and the extended cosine-fourth law we are ready to consider the design of flashcube shields and other useful objects. The chemical flashbulb is (was?) an awkward source of light, for optical design, because it is almost as large as the available optical components, and because the shield sometimes used with it is so close that it has only limited effect on the light distribution. Nevertheless, there are some design tricks that can help the light distribution. The Polaroid Reporter(R) / EElOO(R) folding pack film camera used a transparent protective shield near the flashcube to smooth the distribution of light along an extended object plane. The design had two purposes: to reduce the light delivered to the center of the object plane (without wasting it), and to increase the light delivered to the ends of the object plane. Both actions may be understood more easily with the help of an ant placed on the object plane. Because a flash is very bright, we will help the ant by replacing the hot plasma of the flashbulb with a stuffing of red yarn -- not only is it easier to look at, but it also lasts longer and is easier to study. One will quickly understand that the relative light received by the ant at one place or another on the object plane is closely related to how much red yarn he sees when he looks at the bulb. (One can make this observation as real as you like just by picking a hole in a flashbulb with a sharp needle and poking red yarn through the hole. I have called this the "red yarn trick".)
The axial illumination is easy to reduce by putting a series of 45i -sided vee grooves on the bulb side of the shield, across the center. What the ant sees there from the center of the object plane is his own total reflection, if poorly formed, and he can't see a clear view of the red flashbulb at the same time. When the ant moves a little off axis, the total reflection is spoiled, and he sees an unobstructed view of the bulb, with its red stuffing. To increase the red-looking area of the flash when seen from the ends of the object plane, one adds Fresnel prism facets on the object side of the flash shield, directed to give the ant an extended view of the red yarn beyond the farther boundary of the bulb itself. There is a limit to the usable prism angle, because too much will produce total internal reflection, and the ant will lose more red at the nearer end of the bulb than he gains at the farther end. If one tries to put the Fresnel prisms on the bulb side of the shield, this trick may not work at all, because the total reflection occurs before any useful elongation of the apparent bulb. We had to generate optical features on both sides of the mold for this part. (In these illustrations, a second flashcube has been fastened to the first so you can see how it would look without the shield.)
[Reference: U.S. Patent #4,204,269; May 20, 1980; "Optical Element for Redistributing the Light Output of a Photoflash Lamp Assembly or the Like" W.T. Plummer]
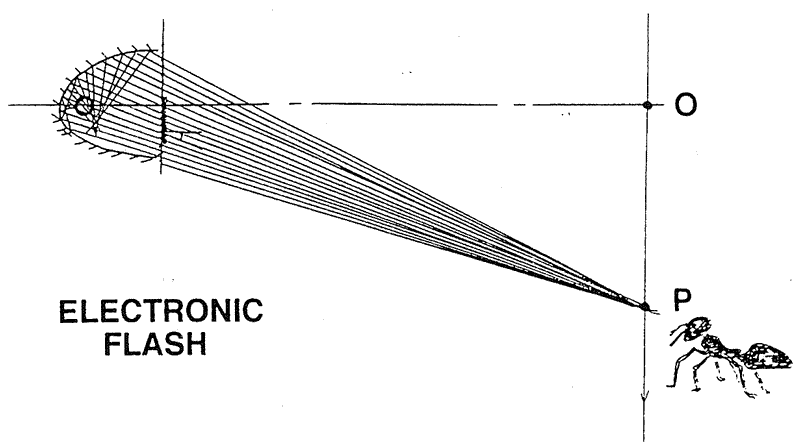
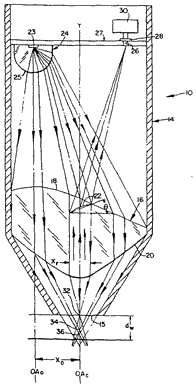
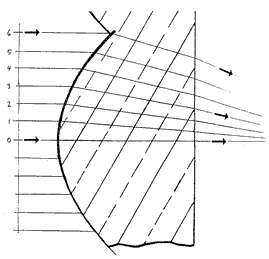
* Design of electronic flash reflectors: Unlike the chemical flashbulb, the electronic flash tube is usually very small in one direction, so its illumination pattern can be controlled in that axis by shaping a reflector. In the other axis it is long, and behaves much like a chemical flash. In a common application a flashtube is mounted far enough behind a little window so that the direct light from the tube just spans the desired scene angle of coverage. A cylindrical reflector is then wrapped around the tube, from one edge of the window to the other, to collect the greater angular output from the tube and redirect it into the scene angle as well. The design can be managed so that the illumination on a flat object plane is quite uniform, up to a limiting angle with a sudden cutoff. While there may be other ways to calculate the best shape for the reflector, the extended cosine-fourth law leads us into it in a natural way. One lays out the optical path of the reflector and tube, and includes the object plane surface some large distance away. Then one applies a fine grid to a dummy flat surface across the open face of the flash window. With a long, thin tube a one-axis grid is enough to tell the story. In the imagination the flash tube is stuffed with red yarn. Then from one place or another on the object plane, rays are traced to each grid space of the flash window, then on to the reflector, and finally
are reflected through the tube itself. If the ray hits the red yarn, it is counted with the weight of its cosine-fourth value. This process leads to a full prediction of the light distribution from any one reflector shape. If the reflector is now described by some convenient mathematical form, such as an ellipse or a polynomial, the parameters of it can be used as optimizing variables to provide the desired spread of light. The ant in object space will see a narrow strip of red reflector when he is near the middle of the object field; as he leaves the central plane, he will see the far side of the reflector grow increasingly red, then suddenly lose that color. Here a weak prism shows the sudden change in color:
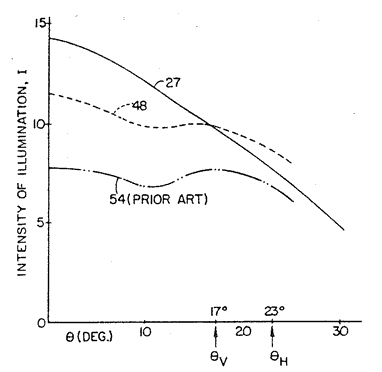
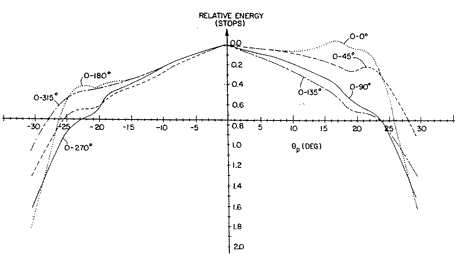
A reflector of circular section will produce a humped output distribution, weak at the larger angles. Shops will be tempted to approximate a more general reflector shape with just a few interpolating circles -- a bad practice because of jumps in light distribution where the circles meet. What one will see is a "shadowgraph" projection of every jump discontinuity in the curvature; this point may sound minor, but the curvature may change by a factor of ten from one part of the reflector to another. Such problems may be avoided by using a geometric form continuous through its second derivative, or at least a heck of a lot of circles! A typical product may look like this, when relative energy is graphed against angle. The O-0i and O-180° curves are perpendicular to the flash tube, showing a sudden drop at the edges of the scene, while O-90° and O-270° are along the tube:
The long axis of the electronic flash is usually made parallel to the long dimension of rectangular film, since the light spread in that axis is harder to control. In fact, the distribution of electronic flash illumination along the object plane can be described fairly well by the cosine-fourth law -- but you had guessed that. When that object plane is photographed, the cosine-fourth illumination and the cosine-fourth efficiency of the camera optics combine to give a cosine-eighth darkening along that axis. Across afield angle of ± 20° the ends of the picture are exposed by only 60% of the value at the center.
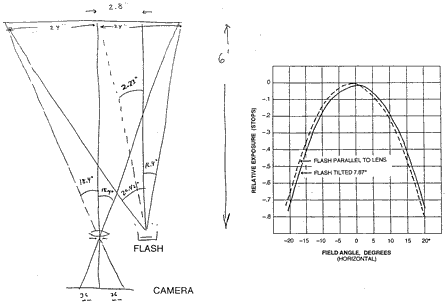
This effect is most noticed when the electronic flash is placed a couple of inches to one side of the camera lens to avoid "redeye", and when the object plane is nearby. The lack of symmetry in angles from the flash then becomes especially obvious, as the far end of the photograph is substantially darker. One may attempt to correct the imbalance by "aiming" the flash a little toward the lens axis, but that will help only one of the eight cosines, and has surprisingly little effect. In this particular example, a parallax of only 2.23° requires a flash tilt toward (and across) the axis of 7.87° to rebalance, an effectiveness of only about 28%. An ant on the object plane would understand. When the flash reflector is shaped to produce the desired distribution in the "easy" direction we don't usually think much about the "image" of the flash tube that is formed a short distance outside of the reflector. It is generally a rather poor image; in manipulating the distribution of light, what we are really doing is manipulating the spherical aberration in that image. In one application we desired to produce an asymmetric light distribution, to favor heads over knees in average photographs, and achieved that goal by mounting the flash tube 0.5 mm below the reflector axis to exploit a bit of the coma. [Reference: U.S. Patent #4,356,538; October 26, 1982; "Photographic Lighting Apparatus" W.T . Plummer].
The use of spherical aberration to control light can be seen in the example of a barcode reading lens designed by P. Clark:
[Reference: U.S. Patent #4,675,531; June 23, 1987; "Optical Scanner Having a Multi-Surfaced Lens Arrangement for Producing a Rotationally Symmetric Beam"]
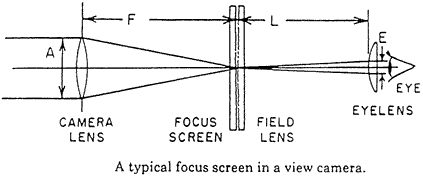
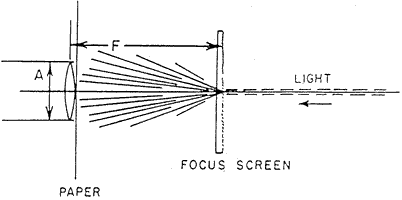
* Design of focus screens: Sometimes the reversibility of a light path will simplify an illumination problem. A typical view camera can be shown schematically as a photographic lens, a focus screen, a field lens, and an eye lens for viewing the image comfortably. That focus screen is needed to prevent the eye from accommodating to an improper position of focus, but also to give the eye samples of light from all parts of the photographic lens. Together, these functions are needed to make an out-of-focus image look blurry, the way a photograph will record it. Do we always just use ground glass, or is a focus screen designed? What are the trade-offs in the design of a focus screen?
The situation may be clearer if the light path is reversed, as if tight beam of light left the eye, came to a focus on the screen, and then scattered toward the photographic lens. The focus screen spreads the beam of light into some kind of pattern across the pupil of the photographic lens, and the density of distribution of light in that pattern is an exact complement of the relative weight that the eye will give each part of the pupil when previewing a scene. In turn, just as we found for the unusual case of the iris shutter, that weighting function will describe the point spread function of an out-of-focus small spot. To present a substantial blur to the eye, the weighting function (or spread of the beam at the pupil) must be as large as we can make it.
(Shown here is a tight beam light, as if from the eye, hitting the focus screen from behind and scattering onto a piece of paper near the lens pupil: )
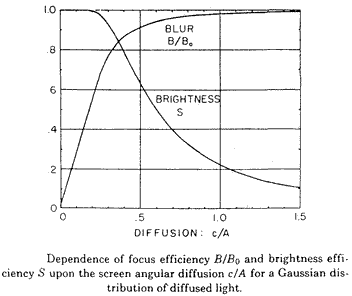
On the other hand, any part of the beam spread beyond the limits of the pupil will correspond to a proportion of darkness, averaged in by the eye, and will dim the view. We limit this problem by reducing the spread of the beam to some minimal size. Faced with such a compromise, we graph both properties, the blur and the brightness, as a function of the angular spread. If we take the screen as a gaussian scattering material, we can even do the calculation with simple integrals. The result confirms that good focus screens can be made, and can even be designed.
The actual embodiment of the focus screen that inspired this study was reflective, and it was formed on a Fresnel field mirror in the Polaroid SX-70 folding Single Lens Reflex camera. The facet spacing was 0.125 mm, and the tiny surface irregularities that provide the controlled diffusion are nearly gaussian, with maximum slopes of about 2° and an average depth of about 1/2 wavelength:
In our previous examples, ray tracing methods have helped to understand or control the distribution of light. But in the case of the focus screen, understanding of the illumination issue has become pivotal to understanding of the observed sharpness of an out-of-focus image, sometimes conventionally thought to be a ray tracing issue. [References: Plummer, W.T., "Focus Screen Optimization " Appl. Optics 14(11 ), 2762-2765 (1975). U.S. Patent #3,718,078; February 27,1973; "Smoothly Granulated Optical Surface and Method for Making Same"] Prof. Ogura of Tokyo University has shown that the blur and brightness properties of the gaussian spread can be improved upon by using a screen made with little conical pits or bumps, so that all of the viewing light comes from the outer edge of the pupil, with little waste. Minolta makes their SLR focus screens that way.
* Design of projection screens:
A reflective or refractive projection screen can be designed with the same approach that was used for the electronic flash reflector. The idea is that such a screen distributes light with an intensity pattern defined by the fractional area of the surface that is oriented to forward its incident light into any single outgoing direction.
With only a temporary loss in generality we can simplify the calculation by looking at just one coordinate, by looking at just one of the many parallel elements of a ribbed screen, and by thinking only of refraction. The incoming light may be taken as a uniform, flat wavefront. For calculation we can use a fine one-dimensional grid of points across the width of the one element. With a trial shape, we can calculate the outgoing angle of a ray of light from each point of the grid. Because each grid interval passes the same total light as any other, the relative apparent screen brightness in any azimuth is proportional to the reciprocal of the angular difference between the rays from the two ends of any such interval.
To increase the light in a particular direction, one identifies the part of the curve with the appropriate slope to refract light into that direction, and then reduces the curvature of the shape there, so that more light will be so refracted. One can describe the entire element shape with a couple of polynomial terms, and can optimize them to provide the desired output, weighted with a cosine if desired to simulate a lambertian reflector. If the calculation is made for a circular lens section, the light distribution has a central hump. A parabola gives a central dip and strong off-axis illumination. Between these special cases one can select an ellipse that gives good balance. There are a number of interesting practical difficulties here, such as an incredibly tight form requirement to provide a sufficiently continuous second derivative when the ellipse is shaped. The Fresnel diffraction pattern from the abrupt limits of the elements may look just like the textbook illustrations. And elements with deep shapes may give the screen an unfortunate amount of room reflection, some of it total. In a difficult case we may have to replace one surface with its negative complement to improve contrast. Usually we want to make a spread in two axes. We can make a two-dimensional spread of viewing angle by combining two crossed screens for separate control of vertical and horizontal distribution of light. What the ant will see, if he inspects the screen carefully, is a series of bright lines of light, one from each element, that become wider or narrower with changes of viewing angle as prescribed by the design. With crossed screens he sees the scene segmented in both axes, as a pattern of tiny bright rectangles. [References: U.S. Patent #3,848,980; November 19, 1974; "Projector Apparatus and System Employing Unique Screen" W.T. Plummer; U.S. Patent #4,147,408; April 3, 1979; "Back Projection Viewing Screen" W.T. Plummer]
* Halation and the nonlinear formation of an image in a thick photographic print:
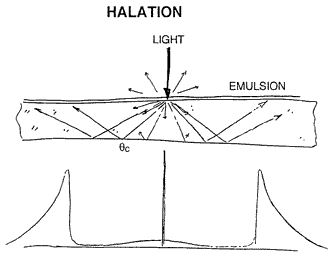
Early glass photographic plates showed halation -- a little halo around any overexposed bright spot -- the consequence of light scattered by the emulsion, then reflected back to the sensitive emulsion by the back surface of the plate. A sharp bright ring appeared where the angle of incidence on the back surface was large enough to contribute total internal reflection. On its outer edge the bright ring was less sharp. (In fact, the exposure change with radius was described by our friend, the cosine-fourth law.)
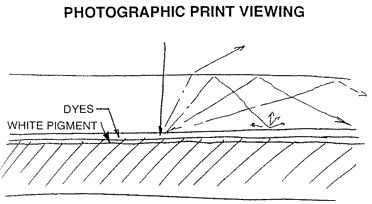
Halation in the exposure can now be eliminated by the use of an absorbing layer on the back side of the negative. But an equivalent optical phenomenon can be found during the viewing of a photographic print containing a clear layer or layers of significant thickness above or near the plane that holds the image. One can study this phenomenon by following a random photon into the print as it is being viewed. The photon passes through the dye image layer on the way in, is scattered by a white surface of some kind, and may travel out through the dyes and the clear parts of the print structure and be visible to the eye. Or it may undergo total internal reflection at the
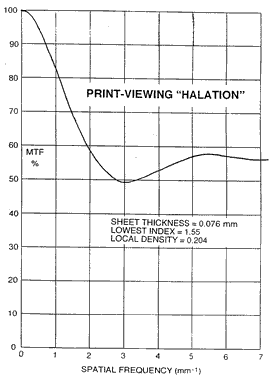
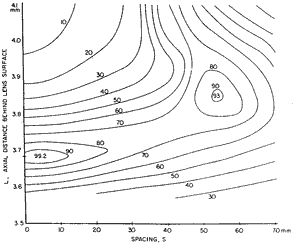
air surface, and pass through the image layer two more times. Some photons will of course be absorbed in the image layer on one or another of the passes. What the eye sees will be a kind of summed geometric progression of quantities of light that have made one, two, or more pairs of passes through the image layer, with large lateral wandering. Only the light emerging after a single trip will convey a fully sharp image; the rest will be degraded to some extent by the wandering. Here is a graph of the image degradation caused by multiple internal reflection of the viewing light:
A problem like this is easy to model with a Monte Carlo technique, in which a large number of photons are introduced and followed step by step as they are scattered or are absorbed. An MTF is derived from the range of positions from which the survivors emerge. One can then calculate a range of MTF results for different assumed average local densities. The MTF graphed here considers no image degradation other than the viewing "halation", and is for the relatively low density of 0.204, in the presence of a thick transparent top sheet. The loss would be much smaller at high densities. The image sharpness situation can be improved somewhat by adding a thin low-index polymer layer deep in the stack, to reflect the wide-angle photons earlier, and thereby limit the average lateral displacements. [References: U.S. Patent #5,176,972; January 5, 1993; "Imaging Medium with Low Refractive Index Layer" I.B.K. Bloom, R.A. Minns, and W.T. Plummer, and in the case of very thin layers, see U.S. Patent #4,499,164; February 12, 1985; "Image Carrying Media Employing an Optical Barrier" W.T. Plummer]
* The photographic shutter as a "lens element":
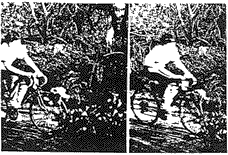
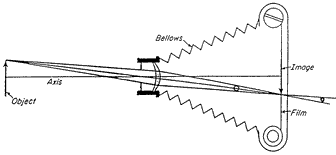
All serious photographers have experienced the classic trade between motion freezing and depth of field, as is illustrated by two extreme sets of aperture and shutter speed for a pair of pictures of a boy on a bike:
An image is commonly evaluated by tracing some large number of rays to an image surface, to form a spot diagram, or point spread function, from which the line spread and modulation transfer functions can be derived in turn. Most usually, such an evaluation is performed at one or another fixed aperture, such as the full aperture of the lens. If the lens aberrations are small compared with the focus and motion problems, a very common situation when people take pictures, the instantaneous point spread function is just a pinhole photograph of the exit pupil of the lens, the "pinhole" being the tiny image of anyone point in the scene. The resulting point spread functions for defocus and motion blur may then be obtained by integrating over any selected function with which the shutter is programmed to open and close:
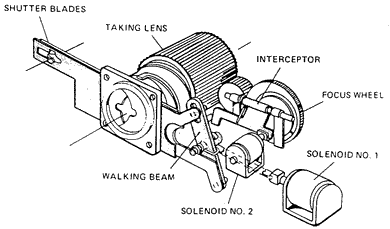
In one convenient design, used in most Polaroid cameras since 1972, the photographic shutter operates by opening and closing the optical path at the aperture stop of the system, so that one mechanism is both shutter and iris. Any given exposure is thus the accumulation of light from a progression of aperture sizes.
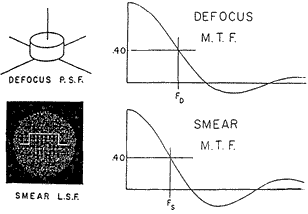
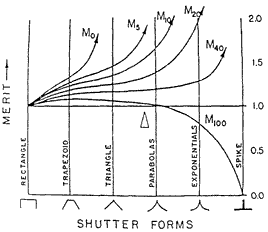
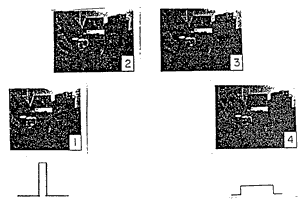
In an image that is static and in sharp focus the result is not remarkable, but in the presence of focus errors and motion smear the result can be quite interesting. One surprising conclusion is that the photograph, in the presence of both defocus and motion, may be substantially better for the use of this form of shutter, rather than the very common focal plane shutter. The iris-shutter quality can be expressed in a figure of merit: M = FD2 FS E , where FD is the spatial frequency for which the MTF falls to a selected threshold because of defocus, FS is the spatial frequency for which the MTF falls to the threshold because of motion smear, and E is the integrated exposure accumulated while the shutter is open. The figure of merit MT can be calculated for any selected threshold T, a modulation percentage, and for a variety of example shutter time functions, such as a rectangle, a trapezoid, a triangle, a parabolic rise and fall, an exponential rise and fall, and an imaginary pairing of an ideal pinhole exposure with an instantaneous large-aperture exposure. To illustrate these quantities, consider an exposure made with a focal plane shutter, so that all parts of the lens pupil contribute equal exposure. The Point Spread Function from defocus, top, gives the MTF to its right. The Line Spread Function from motion smear is the same as the oscilloscope trace of area (light) vs. time, below, with its MTF. The cutoff frequencies FD and FS are shown for a selected threshold of 40%:
The idealized rectangular exposure pulse is merely one extreme. In actual between-the-lens shutters the function is really trapezoidal, and may become triangular with very short times. We will consider all of these functions possible options. The figure of merit, M, is defined so that it will accommodate the usual trade of aperture for exposure time without a change in magnitude, but that magnitude will depend upon the functional shape of area vs. time. Here are some calculated values for M, evaluated at a number of choices of threshold, for six representative shutter functions:
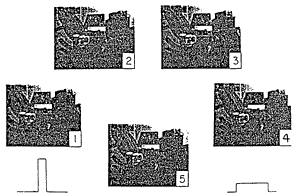
We see that M increases for any choice of threshold as the shutter opening and closing become less abrupt than the rectangular pulse. This increase represents an actual improvement in picture-taking capability. It may be appreciated as better motion freezing, or better depth-of-field, or as effectively higher film speed. In the case of the lower thresholds, which best represent the high spatial frequency content of the images, the improvement continues as the shutter function "point" is made sharper. Here first are a set of four photographs taken of a table-top scene. There is a moving calendar in the background, in sharp focus, and a variety of cups and bottles closer to the camera. From left to right the manual camera shutter was varied from a short exposure at f/8 to one four times as long at f/16. There is a progressive improvement in depth-of-field and a progressive worsening of the motion blur:
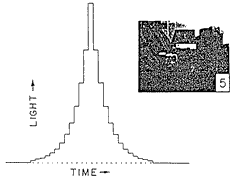
The interesting exponential shutter function can be simulated with a manual conventional shutter by taking a multiple exposure. The next illustration shows the same scene photographed with the exponential shutter function, simulated with a set of 25 exposures, advancing from f/64 to f/8 and back again, as graphed:
We can use the resulting "exponential" picture, #5, for an easy experimental comparison with the basic rectangular shutter. Here we see all of the pictures in a group. These may be a little hard to see on the screen (and utterly impossible in a small reproduction), but when viewed under normal conditions picture #5 is a good match for #l in its ability to freeze motion, is a good match for #3 in depth of field, and is superior to #2 by both metrics:
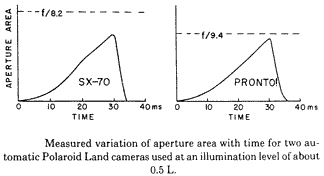
In fact, the observed "exponential shutter" result is superior in both motion-freezing and depth of field to any single pair of aperture and time settings on the manual shutter. Once again we have found an example in which an image sharpness issue can be understood only by following the illumination. Here are actual measurements of the shutter area functions of two early automatic Polaroid cameras, from about 1972 and 1976. The closing command will come earlier or later with different light levels. The lack of symmetry reduces the possible error from variations in closing speed, and also makes the closing fast enough to cut off the exposure from a chemical flash bulb.
[References: Plummer, W.T., "Photographic Shutters: Better Pictures with a Reconsideration of Shutter Efficiency" Appl. Optics 16 (7) 1914-1917 ( 1977). "Use of Optical Concepts to Design and Tolerance Non-Optical Parts of the Photographic System" W. T. Plummer. Opt. Soc. of Am. mtg. on Applied Optics, Rochester, NY , May 1982.] I find it amusing that early photographers used the term "shutter efficiency" as a measure of the rectangularity of their camera aperture funtions, a concept that has meaning only for correcting the reading from a separate light meter. The discussion here shows that "shutter efficiency" should NOT be considered a virtue when designing an automatic camera, as it is actually a liability for image formation!
* Some f/# system issues: The SX-70 folding SLR camera offers continuous focus from infinity to 10.4 inches (26 cm) by a very small motion of the plano-convex front lens element, in a four-element lens. The aperture stop, an iris-shutter, is in a fixed plane between the third and fourth elements. [References: U.S. Patent #3,695,750 (1972) J.G. Baker; W.T. Plummer "Unusual Optics of the Polaroid SX-70 Land Camera" Appl. Optics 21, 196-202 (1982)] In the design of the automatic-exposure electronics, a question was once raised about the exposure compensation that might have to be applied because of changes in the focus setting. After all, it was argued, a displacement of that front element to focus near to the camera will reduce the focal length of the lens, and will even increase the size of the entrance pupil. Since the f/# of a lens is defined as the former divided by the latter, it would decrease, and we should have to compensate for it by reducing the exposure time.
We then discussed the difference in meaning between the infinity f/# of a lens and the effective f/# at the film. We discussed the (1+m) correction factor for the f/# that is applied in macro photography, to compensate for bellows extension, and we discussed the correction to that correction that is made when the lens has entrance and exit pupils of different size. And we argued about whether these many influences would really cancel each other . But all of this labor can be saved if we once more introduce the ant. What the ant sees from the film plane is the exit pupil of the lens. Since the aperture stop and the element after it do not change with focus in this camera, the exit pupil also does not change position or size with focus. Only the fully transparent front element moves with focus; so the ant can see perfectly well (and very quickly) that no such exposure compensation is needed! Notice that the aperture stop in an optical system can be tilted, made thick, or made astigmatic, or given unusual spectral properties, to achieve a system benefit not otherwise available. [References: U.S. Patent #3,877,044; Apri18, 1975; "Reflex Camera Viewing System with Stigmatic Exit Pupil" W.T. Plummer; U.S. Patent #4,687,926; August 18, 1987; "Spectrally Filtered Lens Producing Plural f-Numbers with Different Spectral Characteristics" W.T. Plurnmer].
* Multimode optical fiber coupling with lensed connectors:
One popular fonn of connector for joining multimode optical communication fibers uses a collimating lens on each of the ends to be joined. The optical core of one fiber is imaged to infinity by the first lens, and the second lens relays it to the core of the second fiber. The relatively large beams at the lenses are less sensitive to specks of dirt or to errors of spacing or centration. There is an increased angular sensitivity, however, that must be met in the mechanical design.
In exploring the tolerances in such a design, we used ordinary methods to trace skew rays through all of the necessary surfaces, including aspheric shapes on the lenses themselves. A Monte Carlo approach was used to examine the coupling efficiency, and was set up along the following lines:
This model quickly revealed that the lens connectors could be used in an entirely different way, in which each core was imaged onto the entrance pupil of the other lens, rather than onto the core of the other fiber.
(The entrance pupil is simply the circular image of the numerical aperture cone of the fiber -- which is at infinity -- and is found one focal length outside of the connector lens.) In this way efficient coupling can be made with a very large space between the connector halves, as will be desired with beamsplitters, crystal modulators, or other large optical devices. That coupling efficiency will actually be lost if the separation is reduced to an intermediate value!
[Reference: #4,707,063; November 17, 1987; "Widely Spaced Fiber Optic Connector and Multiplexer/Demultiplexer Using Same" W.T. Plummer]
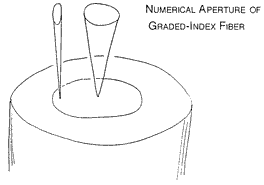
The Monte Carlo model is easily extended to represent a graded index fiber. One replaces the circular cone of numerical aperture with an elliptical one. The major axis remains essentially the same, but the minor axis has a size appropriate to the local index for the radius to the point on the core where the ray is launched or captured, and the orientation of the ellipse is aligned with the minor axis to the azimuth of the ray position from the core center. Where do these elliptical cones come from? Just ask your ant what he would see if he looked at the available numerical aperture through a tiny spot localized within the core.
* How important is this illumination stuff?
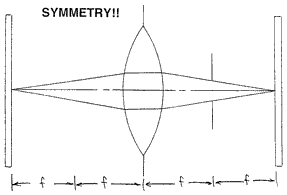
A little series of exercises will show how important some fundamental illumination ideas can be in optical design, and how these ideas can even limit our ability to put rays where we want them. Let us start with a symrnetrical lens used as a 1:1 image relay:
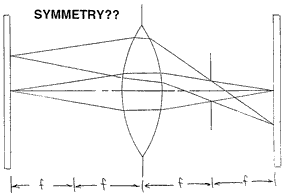
We'll break the symmetry a little by putting the stop one focal length after the lens. The lens is now telecentric on the object side, but not on the image side. Or we can reverse this system. When we try to do the cosine-fourth law calculation, we seem to lack symmetry in the field angles, and therefore in how light is distributed on the image surfaces:
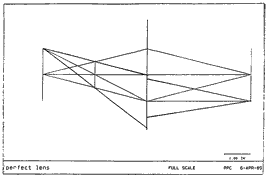
P. Clark has kindly used the "perfect lens" provision of Code V to explore the meaning of the cosine-fourth law for this case. We note that a flat object surface on the aperture-stop side is imaged almost telecentrically, but that the output beam has lost numerical aperture, presumably causing a symmetrical illumination loss off-axis on the telecentric side. The finite thickness of the perfect lens has allowed the limiting rays to jump in space between the principal planes, or this compensation could not have happened:
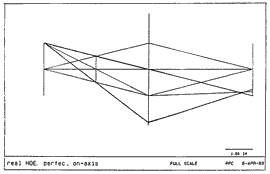
We repeated this trial with a real Holographic Optical Element, designed to be perfect on axis. The HOE is very thin, so the limiting rays are continuous. We see that a substantial field curvature is introduced off axis on the telecentric side:
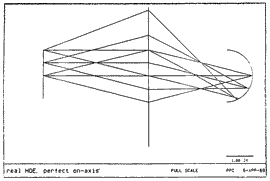
When the lens is reversed, and we enlarge the numerical aperture enough to fill the aperture stop, the field curvature becomes extreme. A few more field positions make the curvature clearer:
The photometric part of the paradox is resolved if we notice that the image surface seems to lie on a sphere passing through the aperture stop itself. What we have is exactly the special case found inside an integrating sphere, where the two obliquity cosines from any pair of surface elements just cancel the cosines that arise from the inverse square law of their separation, giving equal light transfer between all such pairs of elements. Not only do these photometric ideas carry us a little Beyond Ray tracing, but they in fact may reveal useful limits on what a Perfect Lens may be able to do!
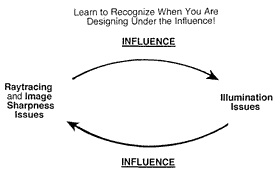
* What Are the Messages to Take Home? The irregular seam between conventional lens design and the calculation of illumination issues is a tricky one, full of peril and opportunity. Each flavor of practitioner can benefit by learning more about the methods of the other, and both need to watch out for the advances happening in the computer art arena. How can a designer best be alert to the opportunities of the interdependence of these ideas and avoid the perils?
And remember that, after your favorite computer, your key optical tools may be:
|